I see dispute escalation to Agent. How does this process work?

Dispute escalation takes place when either buyer or seller invites an Agent, a neutral third party, to resolve the case. It is the second step in the dispute process and must result in contract execution.

A contract is considered executed when the payment (agreed amount) has been released from it to:

a) seller’s address (successful contracts and simple disputes);

b) seller’s and Agent’s addresses (the Agent’s fee is deducted from the amount and the rest is released to the seller’s address);

c) buyer’s and Agent’s addresses (the Agent’s fee is deducted from the amount and the rest is released to the buyer’s address);

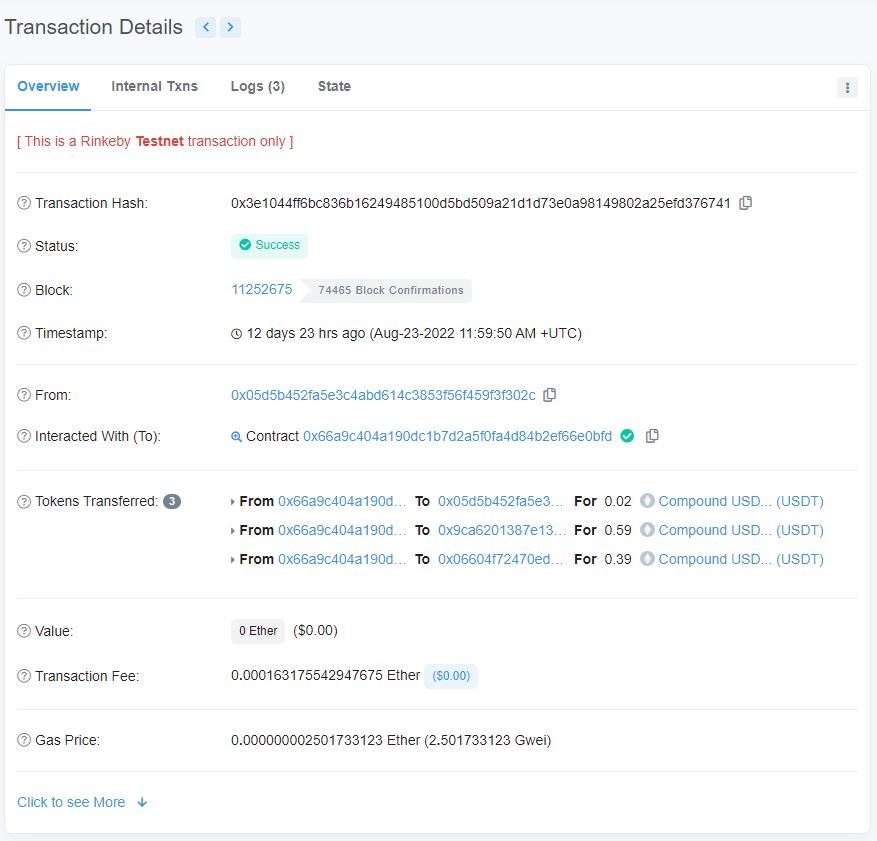
d) split between the buyer and the seller with the Agent’s fee deducted from the amount.

The Agent’s commissions are not deducted if the buyer and seller agree on terms during the dispute but before inviting an Agent. So, unless critical both parties should try to fulfill the contract from each side.

More answers about disputes and how they work can be found here.

How the disputes are settled?

The answer depends on whether or not the dispute has escalated. Simple, or regular disputes are mutually solved by the parties. 

The buyer and seller set the new deadline for the delivery and clearly define what must be delivered and what is not allowed. For a case to remain anonymous and fair, communication is done via a Contract Chat. It will also provide the necessary details for the Agent if the dispute escalates and neither party accepts claims or new terms.

You can learn more about the dispute escalation process from other questions and answers in this section, or visit User Documentation.

Will the due date also apply to a disputed case?

No, the due date is the initial condition for the escrow contract. Once the case is disputed (or before it), the buyer and seller must agree on a new deadline for service or product replacement in the contract chat.

There are no concrete requirements for a second due date because each case is different. The point of opening a dispute is to settle the disagreements between parties on mutual terms. 

For example, the seller may have initially agreed on delivering the design for a website in 10 days (say August 26 is the due date) but did not take into account the fact that a buyer would send technical requirements a few days after. This leaves the designer less time to work with than initially agreed, and so, the design cannot be delivered by the due date.

In turn, the buyer opens a dispute to settle the new terms for the design. For example, the wireframe layouts must be ready by August 30, and the finished web pages – by September 3. This gives the designer an additional 8 days to fulfill the contract and deliver the product. 
You can find more use cases for dispute settlements here.

When can I dispute and when cannot?

As a buyer you can dispute if:

  1. No product or service has been received before the due date.
  2. The due date has passed with no response from the seller.
  3. You received a damaged or not functional product that is different from the product described in the contract details that both buyer and seller agreed upon.
  4. The service received is very different from the service contracted, and does not meet the conditions agreed in the contract.
  5. You and the seller agreed on new edits/product replacement within an hour/day/week after the due date but failed to deliver. 
  6. The contract is not executed and contains the seller’s payment inside.

As a seller, you can dispute (by inviting an Agent) if:

  1. The due date has passed and the buyer agreed to wait for X number of hours/days/weeks but opened a dispute.
  2. The product has been sent before the due date has passed and the buyer received it but is not willing to accept it and has opened a dispute.
  3. You have provided the service on time and as agreed, but the buyer has not released the payment. Instead, the buyer has opened a dispute.

From all the above, neither party can dispute if the contract has been executed and no longer contains the agreed amount inside. This happens when:

  1. The dispute has been resolved by the Agent and the payment has been made to either side or split between them (including the Agent’s fee).
  2. The buyer closed the dispute without escalation and released the payment to the seller’s address.
  3. Buyer protection time has ended, and the seller released the payment before the buyer opened a dispute.

How to add network (testnet, mainnet) to Metamask account?

The networks supported in Zenland escrow contracts are the popular networks that can be easily added to Metamask in just a few clicks. This is done internally and you don’t have to leave the website.

Step 1. Log in with the Metamask account.
Step 2. From the Top Panel click on the network displayed.
Step 3. Choose the network from the dropdown. The message with the network details like RPC, Chain ID, and decimals will appear in your Metamask window. 
Step 4. Check the details and click “Add” to add the network to your Metamask account.

Add network to Metamask from Zenland networks dropdown

Another way to do that is through any network listing website.

  1. Go to a network listing website (chainlist.org for example)
  2. Click “Connect” to connect the site to your Metamask wallet and transfer the network data.
  3. Confirm the connection inside the Metamask window.
  4. You will see the “Add to Metamask” button under the selected network. 
  5. Click on it and “Approve” the details like the network name, RPC, chain ID, and currency symbol you see in the Metamask window. 

That’s it. 

The same can be done for test networks through the Chainlist website, or internally, by selecting the appropriate test network from the network dropdown on the Top Panel. 

How to find a token contract address?

There are several ways to find the contract address of the right token. Such token contract is similar to your escrow contract which holds token funds. Only this is the major contract for all units of a particular token where every transaction of it gets recorded.

The first way to find a token contract address is through an explorer:

  1. Go to the relevant blockchain explorer (Etherscan for ERC-20 tokens, or BSC-scan for BEP-20).
  2. Enter the token name into the search to see a list of tokens with similar names. Usually, the first one is the one you need. 
  3. Click on the contract address at the top to copy it to your clipboard.
  4. Paste into Metamask “Token address field”.

The second way to find a token contract address is through a listing site:

  1. Go to CoinMarketCap, Coingeeko, or another coin listing website.
  2. Enter the token name into the search bar (for example, DAI)
  3. Copy the contract address from the “Info” section on your right.
  4. Paste into Metamask “Token address field”. 
Quick Tip When copying the token address make sure it is the right network (the escrow contract network matches the token network). USDT, for example, is supported by Ethereum, Binance, and other networks and has different token addresses in each network. 

No worries if you have imported the token but still see no tokens in Metamask. Just double-check the token address and try to import another token with the same name. For example, for test contracts on Rinkeby we use USDT with the token address 0xd9ba894e0097f8cc2bbc9d24d308b98e36dc6d02, while there are other USDT with different addresses.

How to add (import) tokens to my Metamask account?

Metamask will not have all supported tokens of a specific network by default, so in many cases, they have to be exported as custom tokens via a token contract address. If you already know it, follow the steps below to add it to your Metamask account. 

Step 1. Open your Metamask account and click “Import Tokens”.

Step 2. Click on “Custom token” instead of “Search”.

Step 3. Copy-paste the token contract address
You should see “Token symbol” and “Token decimal” autofill.

Step 4. Click “Add custom token”, then confirm by clicking “Import Tokens”

Quick Tip:  Use a blockchain explorer to get the decimals and the token symbol if they do not get auto-filled. Learn how to find the token contract address if you do not have one at hand to import a token.

I cannot see the tokens in Metamask address. Why?

There are 4 reasons why the token is not displayed in your Metamask address:

1. It is a custom token and should be manually imported to your Metamask account.
2. The transaction has failed, got stuck because of the low gas fee (a.i. is still in progress), and the tokens have not reached your account yet.
3. You are using another Metamask address (not the one stated in the contract). Although this is not common, it happens when you are in a rush or worried.
4. The buyer has disputed the contract, and the tokens have not been released to your address.

Either way, there is no need to worry. Here’s a quick walkthrough on what to do if you see no tokens in your Metamask address.

Step 1. Check if the address in the escrow contract matches the address you expect the tokens to be. You or the buyer/seller may accidentally enter another address when creating the contract.

Step 2. If the address did not match but is still your Metamask address, log in through it, import the token, and then, if necessary transfer tokens between your Metamask accounts.

Step 3. To import the right token sent to your address (BUSD, for example) you will need to know the token address. You can follow this guide on how to get the address and import the token so it will appear in your account.

Step 4. Check the state of the contract under “Contracts”. If funds have been released to the seller’s address, the state of the respective contract would change to “Executed”.

If the buyer has disputed and did not release tokens from the contract, it will have a “Disputed” state.

Either way, better if you reach out via a contract chat to clear up disagreements or disproof accusations. Read more on disputes in our User Documentation, or in the Escrow disputes section.

Quick Tip: Blockchain explorers like Etherscan, Polygonscan, or BSCscan can help you see whether or not the tokens have been released from the contract to your Metamask address. 

How to use Metamask wallet on Zenland?

You connect through your Metamask wallet by signing in the message in the opened window. This does not require your password or cost any gas fee. By signing in you simply confirm that you are an account holder for a specific Metamask address and agree to the Zenland Terms of Service.

Once logged in, you see the new escrow contract form by default. Creating and approving it on both sides do not require a gas fee and thus, no Metamask transactions must be confirmed. All other contract operations like “Deployment”, “Transfer”, “Fulfillment”, “Dispute” or “Release” will, however, require a confirmation.

Thus, the operations have initiation (a user clicks on the button) and confirmation (a user signs/declines a Metamask transaction).

The process is simpler on PC since you just install the browser extension, create a wallet and use it to login and confirm the transactions.

On mobile, you would have to switch between your browser mode (to search for https://app.zen.land and connect) and wallet mode to sign transactions. How to use Metamask mobile browser is explained in detail on the Metamask website.

I don’t have the right token. Can I exchange it on your site?

Zenland does not offer any exchange system as many cryptocurrency exchanges do. If you do not have any of the supported tokens (stablecoins), you may use Uniswap, or any applicable “swap” website to exchange the altcoins for stablecoins within the chosen network.

Once exchanged you may proceed with your contract by deploying and transferring it to the selected network.

Quick Tip Note that you must have the token supported by your network of choice. Refer to this post to see which stablecoin tokens are supported by the major networks.